Looking for the Events Calendar Pro shortcodes? You’re in the right place!
With the Events Calendar plugin (by StellarWP, formerly Modern Tribe), you’ll be able to show your events with full descriptions, in a compact design, in a calendar, or with filterable categories. This allows you to give users a clear view of all of your upcoming events.
But – if you want to customize how your events are displayed on your WordPress site and show events on any pages other than your “events” page, the default plugin doesn’t give you full control. For that, you need The Events Calendar Shortcode & Block. You can get a customizable list of events in different layouts (including calendar view), display events by custom parameters such as event category, or dates such as a specific month or event date.
This page shows you the Events Calendar Shortcode & Block shortcodes, for customizing The Events Calendar Pro and free. You’ll need the plugin to make these work, which is available here.
Basic shortcode
To show a list of events, just type the following shortcode (which is just content between [ and ] into the content of a Post, Page or elsewhere shortcodes are supported on your site:
[ecs-list-events]
The Events Calendar Shortcode & Block will replace this with a list of your next five events you have entered in The Events Calendar.
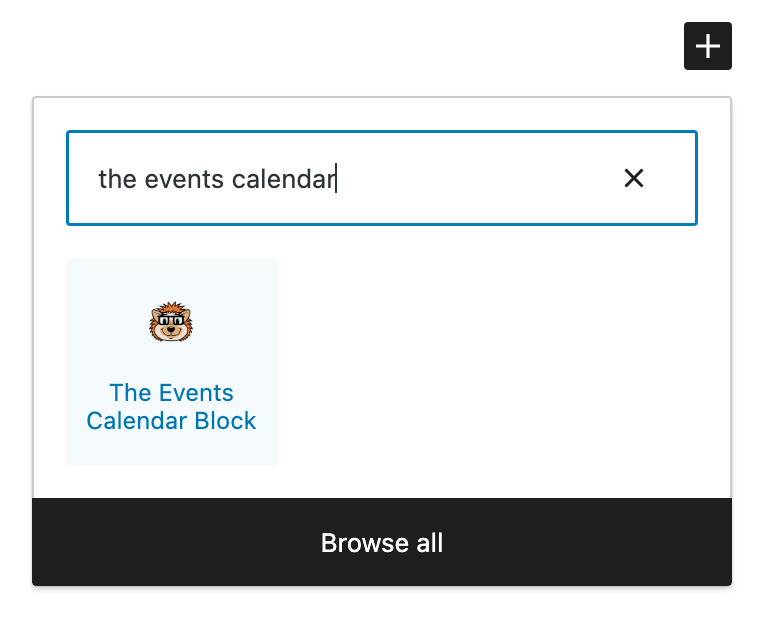
Alternatively, you can use the included Block in the editor to add a list of events. First select the block:
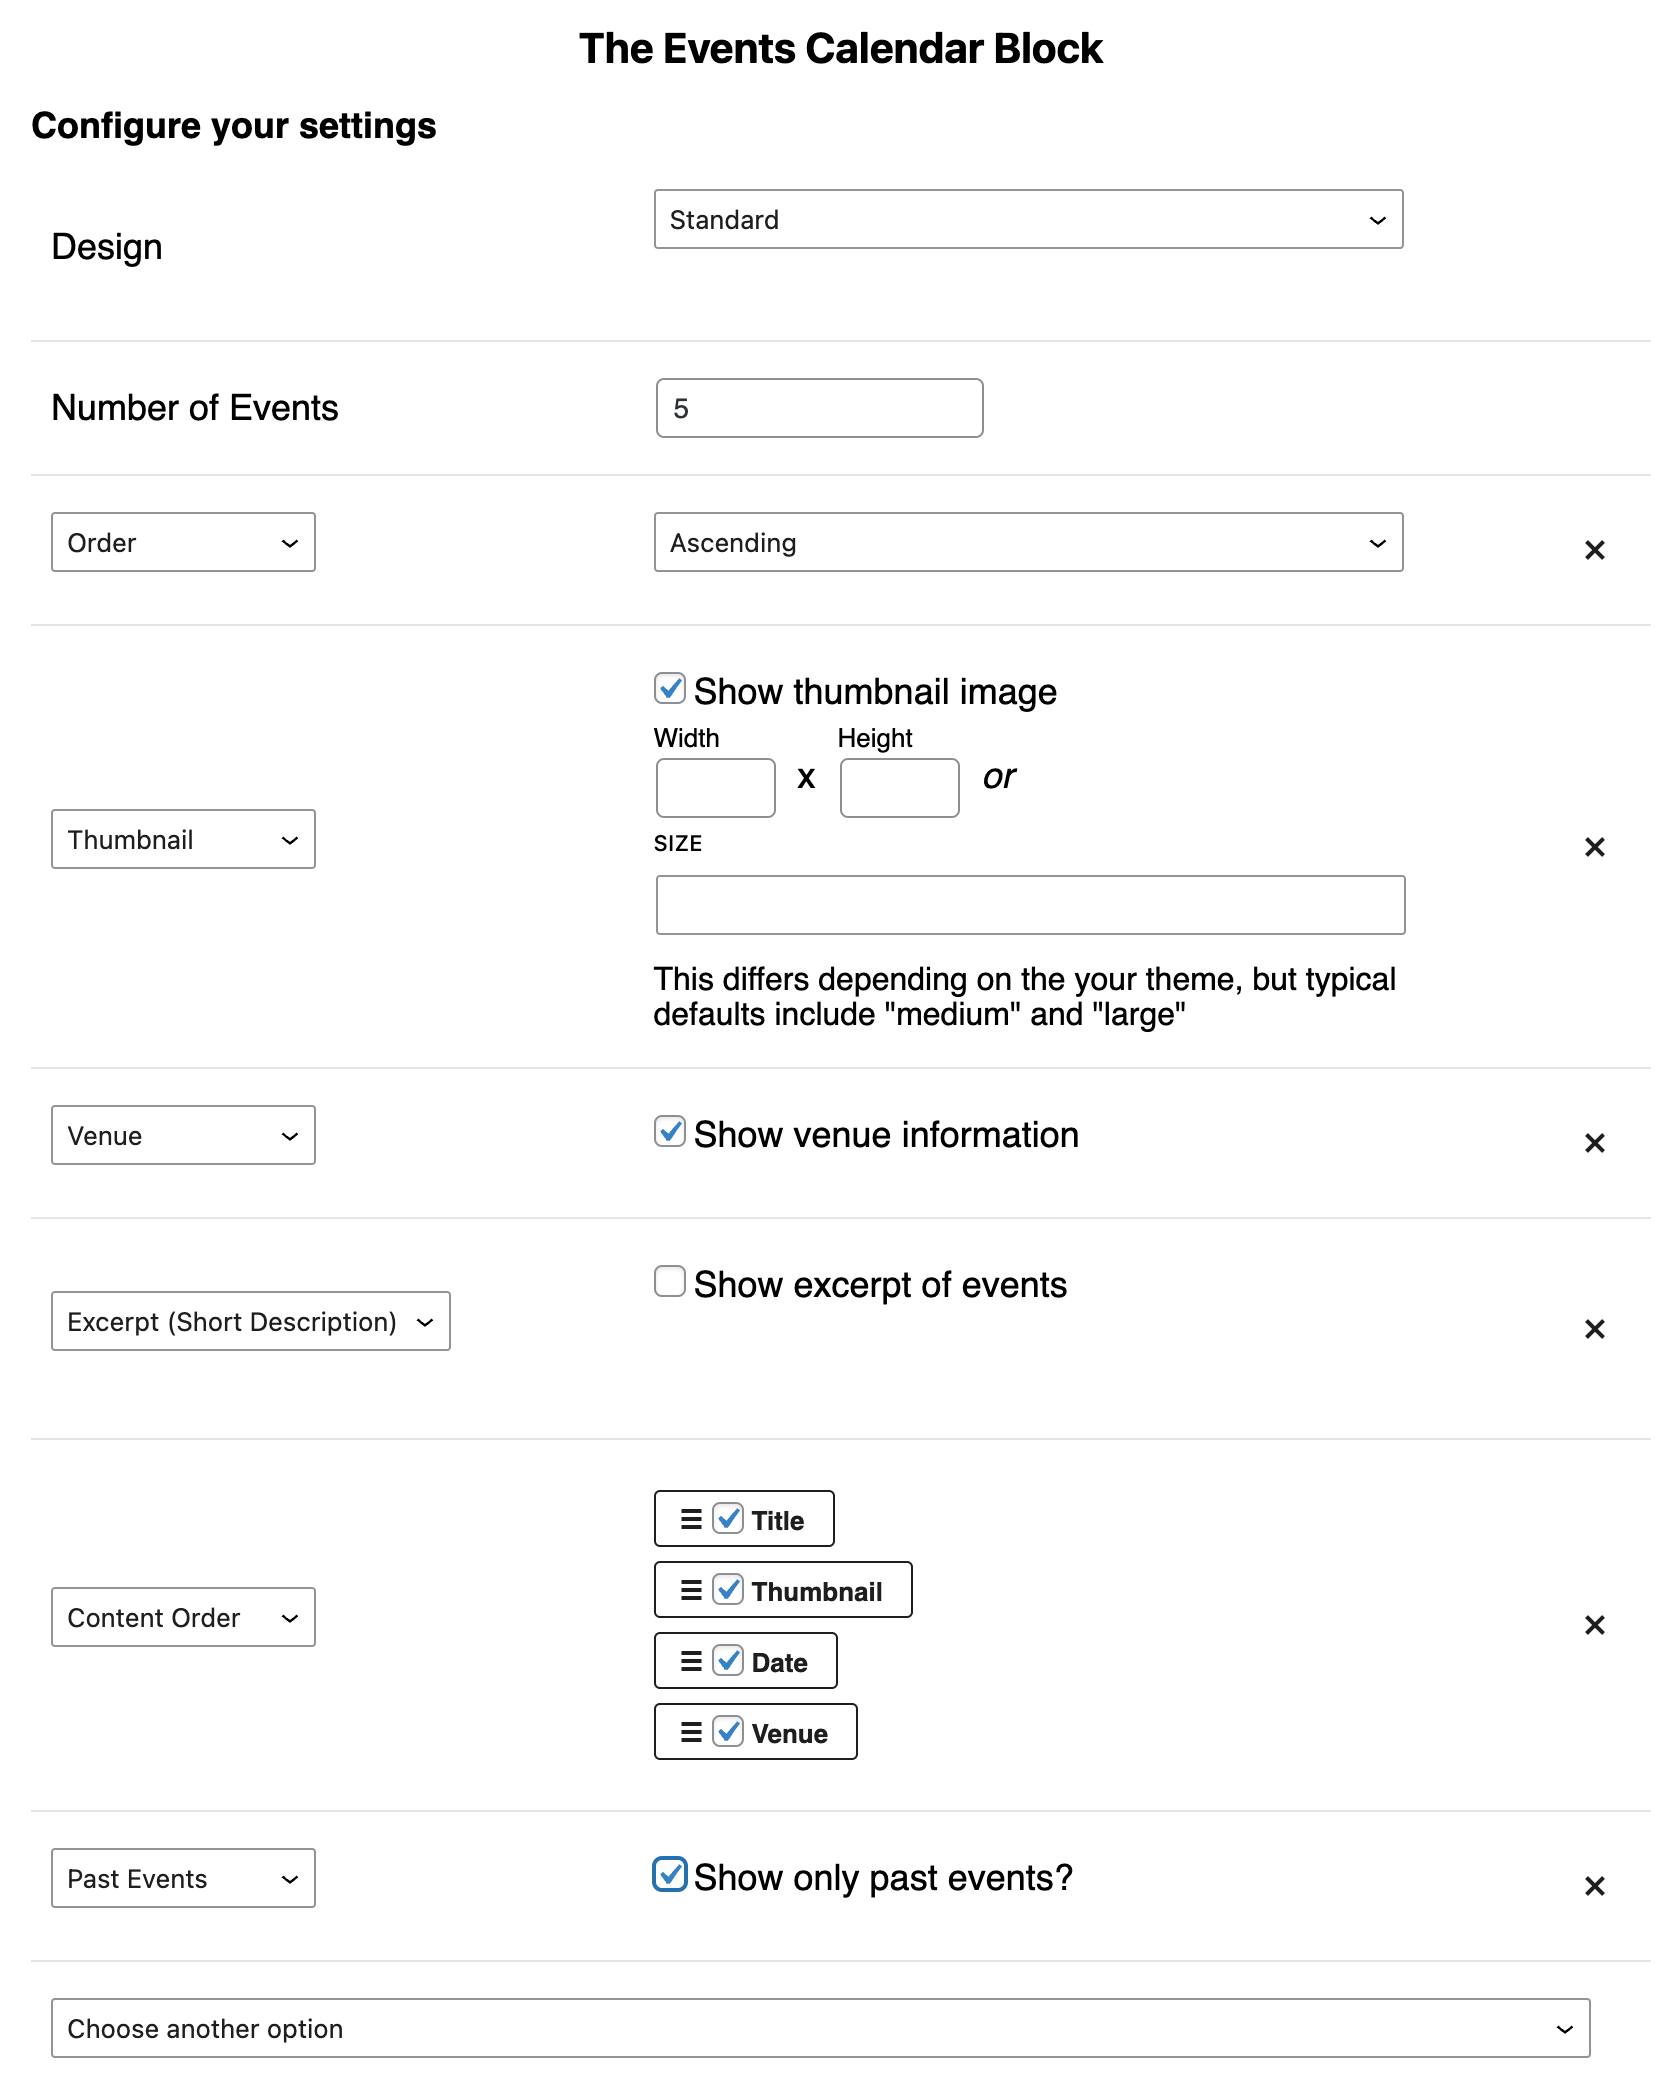
You can then customize the block to show only the events you want, with the details you'd like:
Shortcode Options
When using the block, you can enter the options below by first selecting Choose Another Option at the bottom then pick Advanced/Other:

Then, enter the option as the key and the value in the value box. For example, instead of entering offset="2" in the shortcode below, you would enter offset in the key field and 2 in the value field:

limit
Total number of events to show. Default is 5.
[ecs-list-events limit='3']
offset pro only
Skip a certain number of events from the beginning. Useful for splitting into columns or using multiple copies of the shortcode on the same page.
[ecs-list-events offset='2']
pagination pro only
Show previous and next links, allowing more events to be displayed by visitors. The amount of events on each page can be controlled using the limit value.
[ecs-list-events pagination='true' limit='5']
category
Shows events in a single event category. Use commas when you want multiple categories
[ecs-list-events cat='festival']
[ecs-list-events cat='festival, workshops']
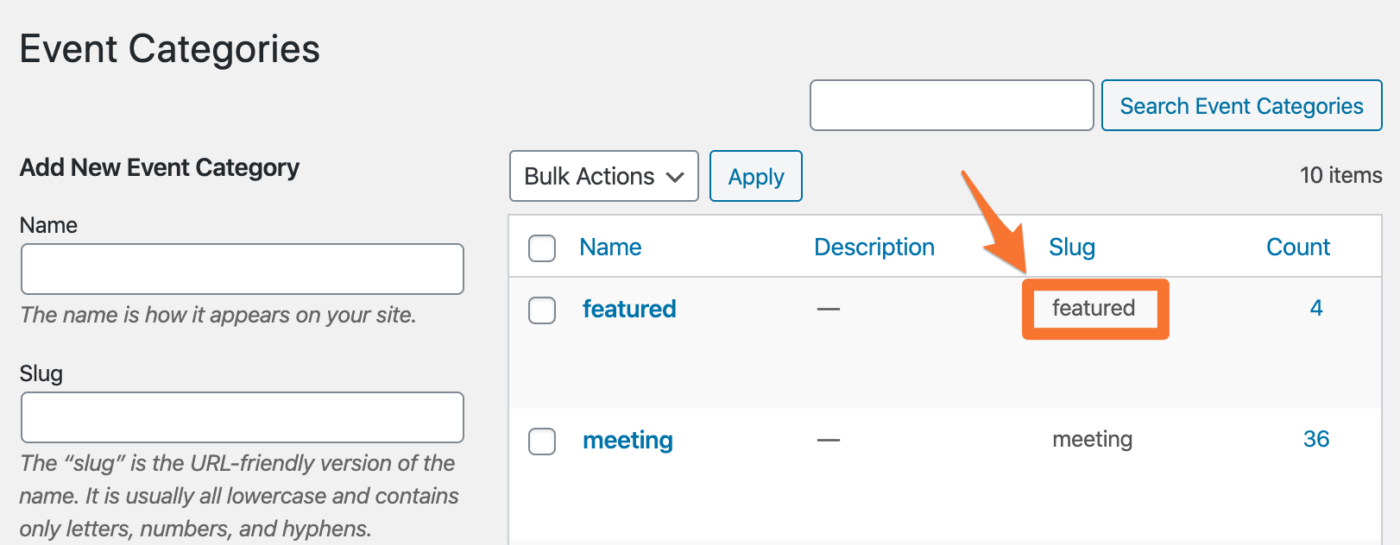
You can either use the category name, or the category slug. The slug can be found by going to Events > Event Categories:
If you want to only include events in both the festival AND the workshops categories, you'll need to use the tag_cat_operator option, ie.
[ecs-list-events cat='festival, workshops' tag_cat_operator='AND']
exclude category or categories pro only
Include events that are not in the specified categories. Useful for excluding any community submitted events.
[ecs-list-events exclude_cat='community']
[ecs-list-events exclude_cat='meeting, gala']
If you want to only include events that are both in the community category but also NOT in the meeting category, you'll need to use the tag_cat_operator option, ie.
[ecs-list-events cat='community' exclude_cat='meeting' tag_cat_operator='AND']
tag pro only
Show events in a single event tag. Use commas when you want multiple tags.
[ecs-list-events tag='special']
[ecs-list-events tag='special, meeting']
exclude tag or tags pro only
Include events that are not in the specified tags.
[ecs-list-events exclude_tag='large-event']
[ecs-list-events exclude_tag='large-event, regular-event']
If you want to only include events that both have the large-event tag but also do NOT have the regular-event tag, you'll need to use the tag_cat_operator option, ie.
[ecs-list-events tag='large-event' exclude_tag='regular-event' tag_cat_operator='AND']
tag/category operator pro only
Instead of showing events that are in at least one of the categories or tags you specify, switch to only show events in all of those categories.
[ecs-list-events tag="meeting, board" tag_cat_operator="AND"]
[ecs-list-events cat="gala, special" tag_cat_operator="AND"]
You can also use this when combining with tags, to show events both in the specified category and in the specified tag:
[ecs-list-events tag="meeting, board" cat="gala" tag_cat_operator="AND"]
author_id pro only
Filter by the author of an event
[ecs-list-events author_id='123']
To find the ID of an author, go to the Users section of your WordPress admin, and then click Edit for the user (author) you'd like to filter by:

then in the top you can see the ID of the author beside user_id=
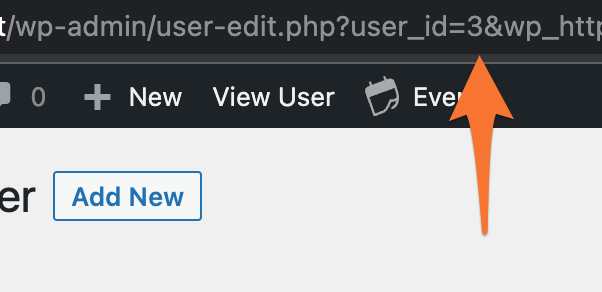
In this case, the author ID is 3
days pro only
Specifies the number of days from today to fetch events. If specified, overrides the month option
For example to get events for the next week:
[ecs-list-events days='7']
Or to get events for the next day:
[ecs-list-events days='1']
day pro only
Get events from a specific day. If specified, overrides the month option
[ecs-list-events day='2023-04-15']
[ecs-list-events day='current']
or a relative date:
[ecs-list-events day='+1 day']
[ecs-list-events day='+7 days']
or for the current day but in future only:
[ecs-list-events day='current' futureonly='true']
[ecs-list-events day='current' key='start date' hide_finished='true']
status pro only
Filter events by their status: scheduled, canceled or postponed. By default will show events of all statuses.
[ecs-list-events status='canceled']
[ecs-list-events status='postponed']
[ecs-list-events status='scheduled']
featured only pro only
Show only events marked as "featured". As you’d imagine, this is perfect for displaying featured events.
[ecs-list-events featured_only='true']
exclude featured pro only
Show events that are not marked as a "featured" event. Perfect for hiding featured events!
[ecs-list-events exclude_featured='true']
hide_soldout pro only
Hide any events that are sold out (used with the Event Tickets or Event Tickets Plus addon by Modern Tribe)
[ecs-list-events hide_soldout='true']
Note that due to the complexity of this option, it may decrease the number of events displayed. You can use the limit option to show more events if needed.
show_hidden pro only
Show events marked as "hide from event listings". Default is false.
[ecs-list-events show_hidden="true"]
hiderecurring pro only
Option to only show the first event from a recurring event (The Events Calendar PRO).
[ecs-list-events hiderecurring='true']
id pro only
Show a single event using that event's ID
[ecs-list-events id='123']
You can find the id by going to the event you want while logged into your WordPress site, then clicking Edit Event at the top:
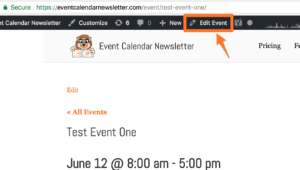
then in the top you can see the ID beside post=
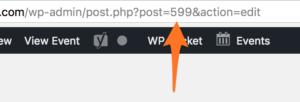
In this case the ID is 599
exclude_id pro only
Hide an event from the listing. Useful if showing related events using the shortcode on an event page, but you want to exclude the current event. Use "current" to hide the ID of the current event or specify one or more IDs (see the id option above on how to find the post IDs you need to exclude).
[ecs-list-events exclude_id='current']
[ecs-list-events exclude_id='123']
[ecs-list-events exclude_id='123, 534']
series_id pro only
Show events within the given series. Use "current" to show additional instances based on the current event or specify the series ID manually.
[ecs-list-events series_id='current']
[ecs-list-events series_id='current' exclude_id='current']
[ecs-list-events series_id='123']
To find the series ID, go to Events then Series in the WordPress back-end. The series ID is located in the top bar beside post=

In this case the series ID is 599
parent_id pro only
Show events with the given parent event IDs. Useful to show related events in the same recurring series. Use "current" to show additional instances based on the current event or specify one or more IDs (see the id option above on how to find the ID of the event).
[ecs-list-events parent_id='current']
[ecs-list-events parent_id='current' exclude_id='current']
[ecs-list-events parent_id='123']
[ecs-list-events parent_id='123, 534']
order
Order of the events to be shown. Value can be 'ASC' or 'DESC'. Default is 'ASC'. Order is based on event date.
[ecs-list-events order='DESC']
eventdetails
To show or hide date. Value can be 'true' or 'false'. Default is true.
[ecs-list-events eventdetails='false']
timeonly pro only
To show the start time only on most designs. Value can be 'true' or 'false'. Default is false.
[ecs-list-events timeonly='true']
venue
To show or hide the venue. Value can be 'true' or 'false'. Default is false.
[ecs-list-events venue='true']
excerpt
To show or hide the excerpt and set excerpt length, which is useful for displaying a short event description. Default is false.
[ecs-list-events excerpt='true']
[ecs-list-events excerpt='300']
raw_excerpt pro only
Uses the raw excerpt rather than stripping any HTML from it or modifying the result in any way.
[ecs-list-events excerpt="true" raw_excerpt="true"]
description pro only
Use the full event description for the excerpt rather than the WordPress excerpt or short description.
Use raw_description with it to avoid modifying the event content at all.
Use filtered_description to use the event description run through "the_content" WordPress filter, which usually adds things like line breaks and new paragraphs.
[ecs-list-events excerpt="true" description="true"]
[ecs-list-events excerpt="100" description="true"]
[ecs-list-events excerpt="true" description="true" filtered_description="true"]
[ecs-list-events excerpt="true" description="true" raw_description="true"]
thumb
To show or hide thumbnail/featured image. Default is false.
[ecs-list-events thumb='true']
Specify the size using thumbsize (defaults to medium)
[ecs-list-events thumb='true' thumbsize='large']
You can also use thumbwidth and thumbheight to customize the thumbnail size
[ecs-list-events thumb='true' thumbwidth='150' thumbheight='150']
message
Message to show when there are no events. Defaults to 'There are no upcoming events at this time.'
[ecs-list-events message="No events found"]
cost pro only
Add the cost to the event listing in the default design:
[ecs-list-events cost='yes']
viewall
Determines whether to show 'View all events' or not. Values can be 'true' or 'false'. Default to 'false'
[ecs-list-events viewall='true']
viewall_link pro only
Allows the 'View all' link to go to another page. Useful if you'd like to show some events from a certain category, tag, venue etc, then point to another page showing additional events from that subset.
[ecs-list-events viewall="true" viewall_link="/my-other-page"]
contentorder
Manage the order of content with commas. Default to title, thumbnail, excerpt, date, venue.
[ecs-list-events cat='festival' limit='3' contentorder='title, thumbnail, excerpt, date, venue' thumb='true' excerpt='true' venue='true']
Note this only works on certain designs. For others you'll need to customize the design with these instructions.
month
Show only specific Month. Type 'current' for displaying current month only or 'next' for the next, ie:
[ecs-list-events cat='festival' month='2023-06']
[ecs-list-events cat='festival' month='current']
[ecs-list-events cat='festival' month='next']
With the pro version you can also specify futureonly="true" to only display upcoming events or hide_finished="true" if using key="start date" (to get events based on the start date).
[ecs-list-events cat='festival' month='current' futureonly='true']
[ecs-list-events cat='festival' month='current' hide_finished='true' key='start date']
year pro only
Show only a specific year. Type 'current' for displaying current year only or futureonly='true' for future events only, ie.
[ecs=list-events year='2022']
[ecs-list-events year='current']
[ecs-list-events year='2023' futureonly='true']
[ecs-list-events year='current' key='start date' hide_finished='true']
fromdate pro only
todate pro only
Show events between a certain date range.
[ecs-list-events fromdate='2023-05-31' todate='2023-06-15']
or with relative dates:
[ecs-list-events fromdate='today' todate='+7 days']
[ecs-list-events fromdate='+7 days' todate='+14 days']
or you can specify either the from or the to date, and optionally add futureonly to only show future events:
[ecs-list-events fromdate='2023-07-25']
[ecs-list-events todate='2023-08-20']
[ecs-list-events futureonly='true' todate='2023-07-25']
or use hide_finished='true' if getting events by the start date and you want to hide any that have finished:
[ecs-list-events fromdate='-30 days' todate='today' key='start date' hide_finished='true']
Note the default limit of 5 can be changed using the limit option if needed:
[ecs-list-events fromdate='2023-05-31' todate='2023-06-15' limit='100']
include in progress pro only
For use with fromdate/todate, days, day and year to also include events that are "in progress" (ie. start before and end after the current day).
[ecs-list-events day="current" include_in_progress="true"]
[ecs-list-events year="current" include_in_progress="true"]
[ecs-list-events days="7" include_in_progress="true"]
[ecs-list-events fromdate="2023-01-31" todate="2023-02-28" include_in_progress="true"]
past
Show only outdated events (ie. events that have already happened)
[ecs-list-events cat='festival' past='yes']
[ecs-list-events past='yes' order='DESC']
If you'd like to show both past and future events, you would need to use something like fromdate/todate, or use multiple shortcodes in a row, ie.
[ecs-list-events past='yes' order='DESC' limit='10']
[ecs-list-events limit='10']
city pro only
state pro only
country pro only
Filter events by a location city, state or province, or country. Use a comma to separate more than one. Use -- instead of a comma if the city, province or country name has one.
[ecs-list-events city='Chicago']
[ecs-list-events state='IL']
[ecs-list-events country='United States, Canada']
[ecs-list-events country='Korea-- Republic of']
venue_id pro only
Filter events by one or more venue ids
[ecs-list-events venue_id='52']
[ecs-list-events venue_id='52, 56']
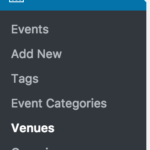
You can find the venue ID by going to Events then Venues in the WordPress administration area:
Then find your venue, click Edit, and the venue ID is at the top beside post:
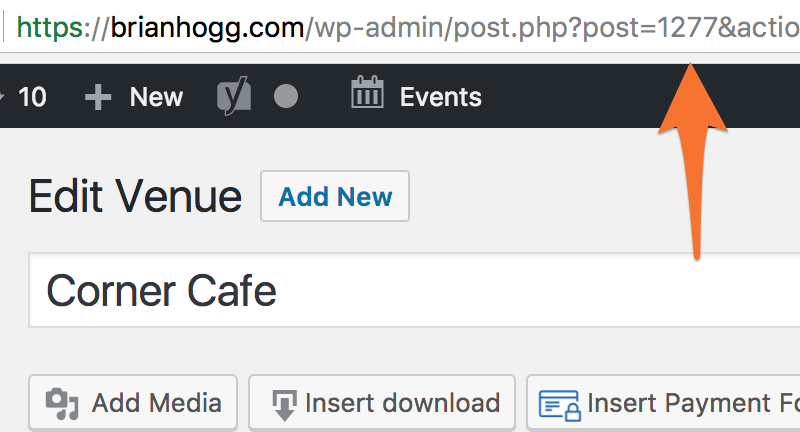
In this case the venue ID would be 1277
organizer_id pro only
Filter events by one or more organizer ids
[ecs-list-events organizer_id='73']
[ecs-list-events organizer_id='73, 77']
You can find the organizer ID by going to Events then Organizers in the WordPress administration area:
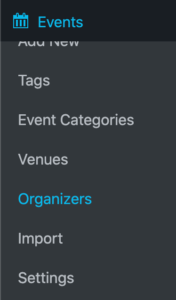
Then find the organizer, click Edit, and the organizer ID is in the current website address beside post=

In this case the organizer ID is 40
key
Used to hide events when the start date has past rather than the end date.
[ecs-list-events cat='festival' key='start date']
orderby
Override the ordering. Useful when you have multi-day events or you don't want to hide the event until the full event time has passed.
[ecs-list-events orderby='start date']
[ecs-list-events orderby='end date']
You can also sort by the title if you wish:
[ecs-list-events orderby='title']
Those are your main shortcode options! With those you can list your events with pretty much whichever parameters you can think of. Here’s the link to the plugin.
Filter Bar pro only
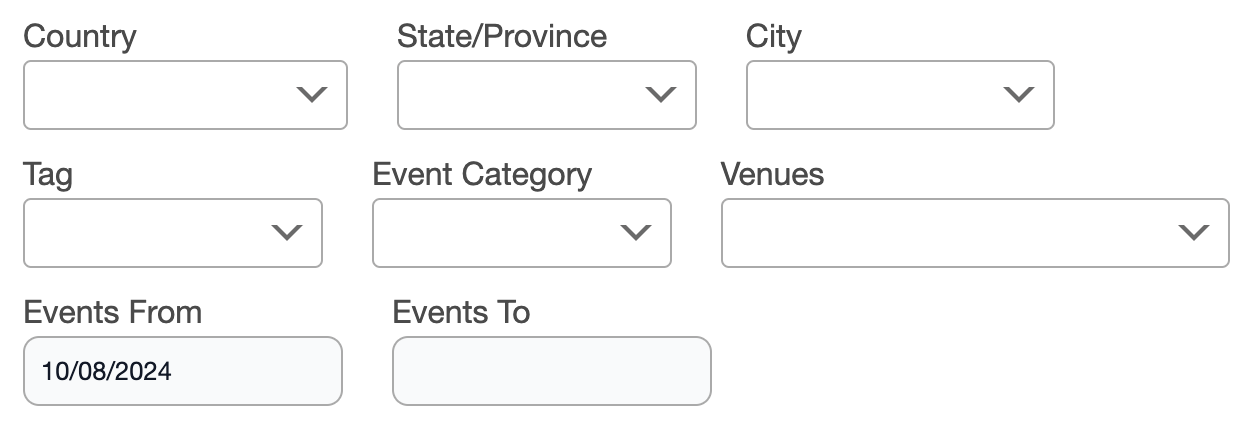
The filter bar allows your visitors to change events displayed, and can be placed anywhere on your site.
You can add the filter bar to any design by using filterbar option:
[ecs-list-events filterbar="true"]
filterorder
If you want to change the order or modify what filters are included, use the filterorder option. For example:
[ecs-list-events design="calendar" filterorder="fromdate, country, state, category, venue, tag" filterbar="true"]
[ecs-list-events design="calendar" filterorder="category, venue" filterbar="true"]
By default the filterorder is set to category, venue, state, country, tag
filterbar-(filter name)-title
You can change the title of any filter with the filterbar-(filter name)-title option where (filter name) is one of venue, category, state, or country. For example:
[ecs-list-events filterbar-category-title="My Category Title" filterbar-fromdate-title="Select Date" filterbar-venue-title="Location" filterbar-tag-title="Event Tag" filterbar="true" filterorder="fromdate, country, state, category, venue, tag"]
You can view some examples on the demo site.
That’s all for filters! You can see how The Events Calendar Shortcode & Block makes it easy for you to select custom filtering options, and get an events list that meets your needs.
Additional Fields pro only
If you use Advanced Custom Fields (ACF) or The Events Calendar Pro with Additional Fields, you can filter by those values when listing events.
Advanced Custom Fields
First, find the name of the field you want to filter by going to Custom Fields and editing the field group:
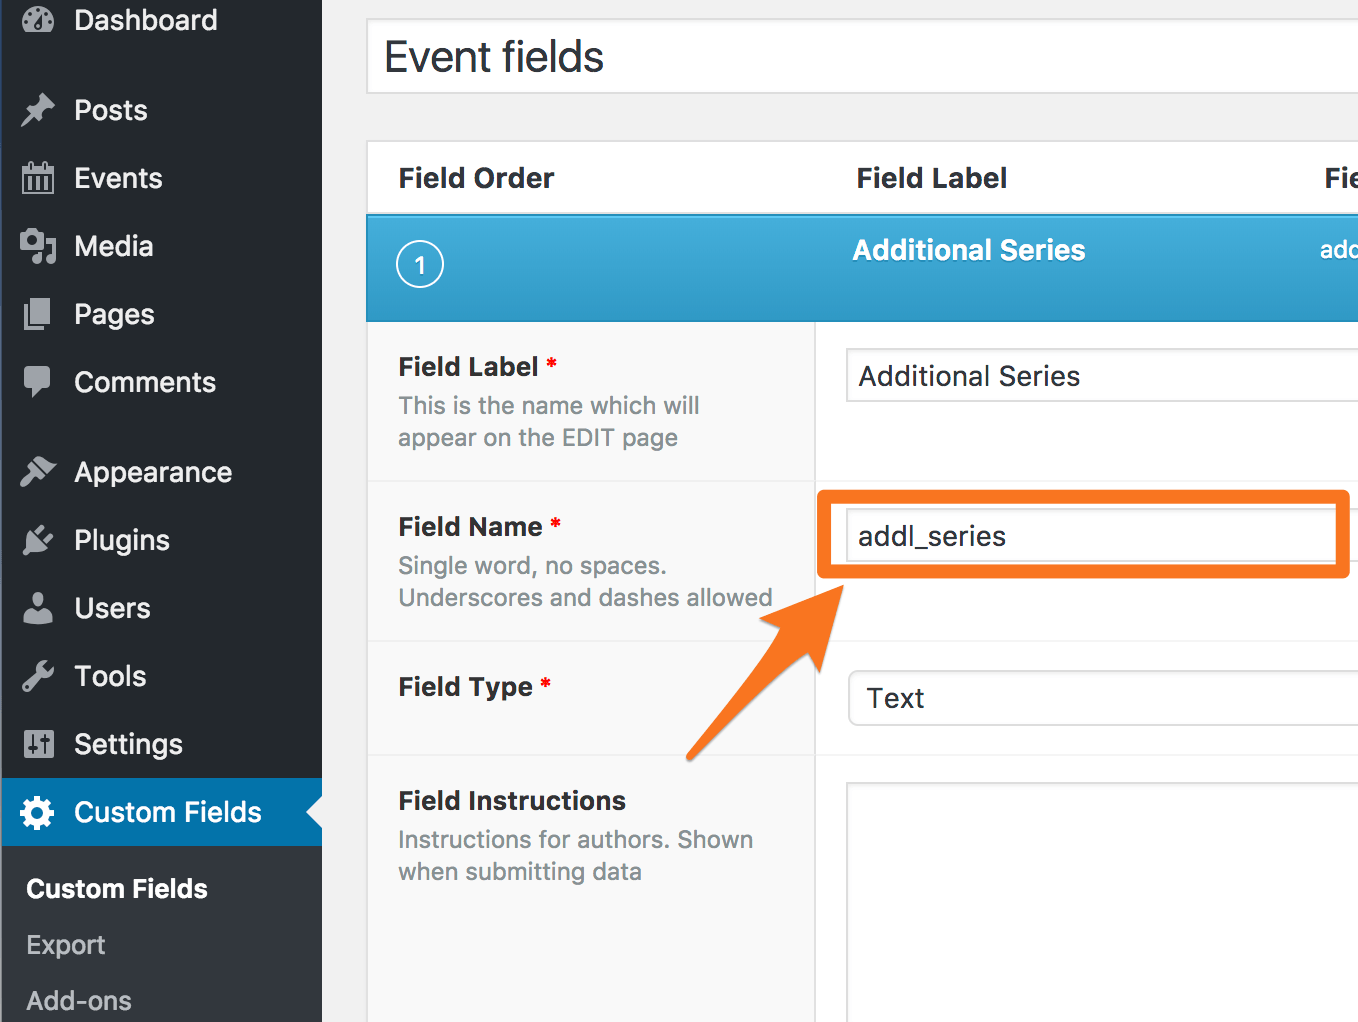
In this case the field name is addl_series
So to only show events with the value "Test Series" in this additional field, you can use:
[ecs-list-events addl_series="Test Series"]
Additional Fields (The Events Calendar Pro)
Finding the name is a little more complex with Advanced Fields. When editing an event, find the field you want to filter by and right-click on it to show a menu. Pick Inspect to show additional details on the field:
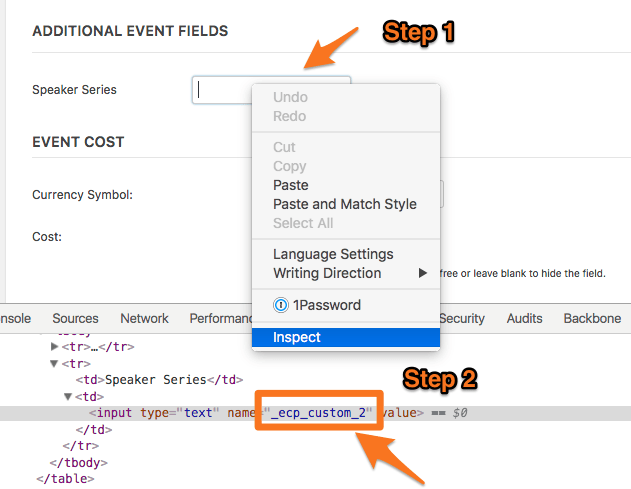
Here the saved name of this field is _ecp_custom_2 and to only show events with "Test Series" in this field you can use:
[ecs-list-events _ecp_custom_2="Test Series"]
If there are square brackets in the name - for example _ecp_custom_3[] - do not use the square brackets in the shortcode, just the _ecp_custom_3 part.

[ecs-list-events _ecp_custom_3="Option 1"]
Use commas to specify that an event must contain all of the options:
[ecs-list-events _ecp_custom_3="Option 1, Option 2"]
and use ecp_operator="OR" to say that an event must have at least one of the provided options:
[ecs-list-events _ecp_custom_3="Option 1, Option 2" ecp_operator="OR"]
If you are using multiple additional fields in the same shortcode, you can specify whether it should match all or any of the values with the ecp_operator option (it is "AND" by default):
[ecs-list-events _ecp_custom_2="Test Series" _ecp_custom_3="Option 1" ecp_operator="OR"]
You can also add custom fields to your filter bars by adding it to the filterorder option, for example:
[ecs-list-events filterbar="true" filterorder="_ecp_custom_2"]
See the demo site for more information on using with filter bars.
Styling/Design
By default the plugin shows a listing of events in a style similar to The Events Calendar's list view.
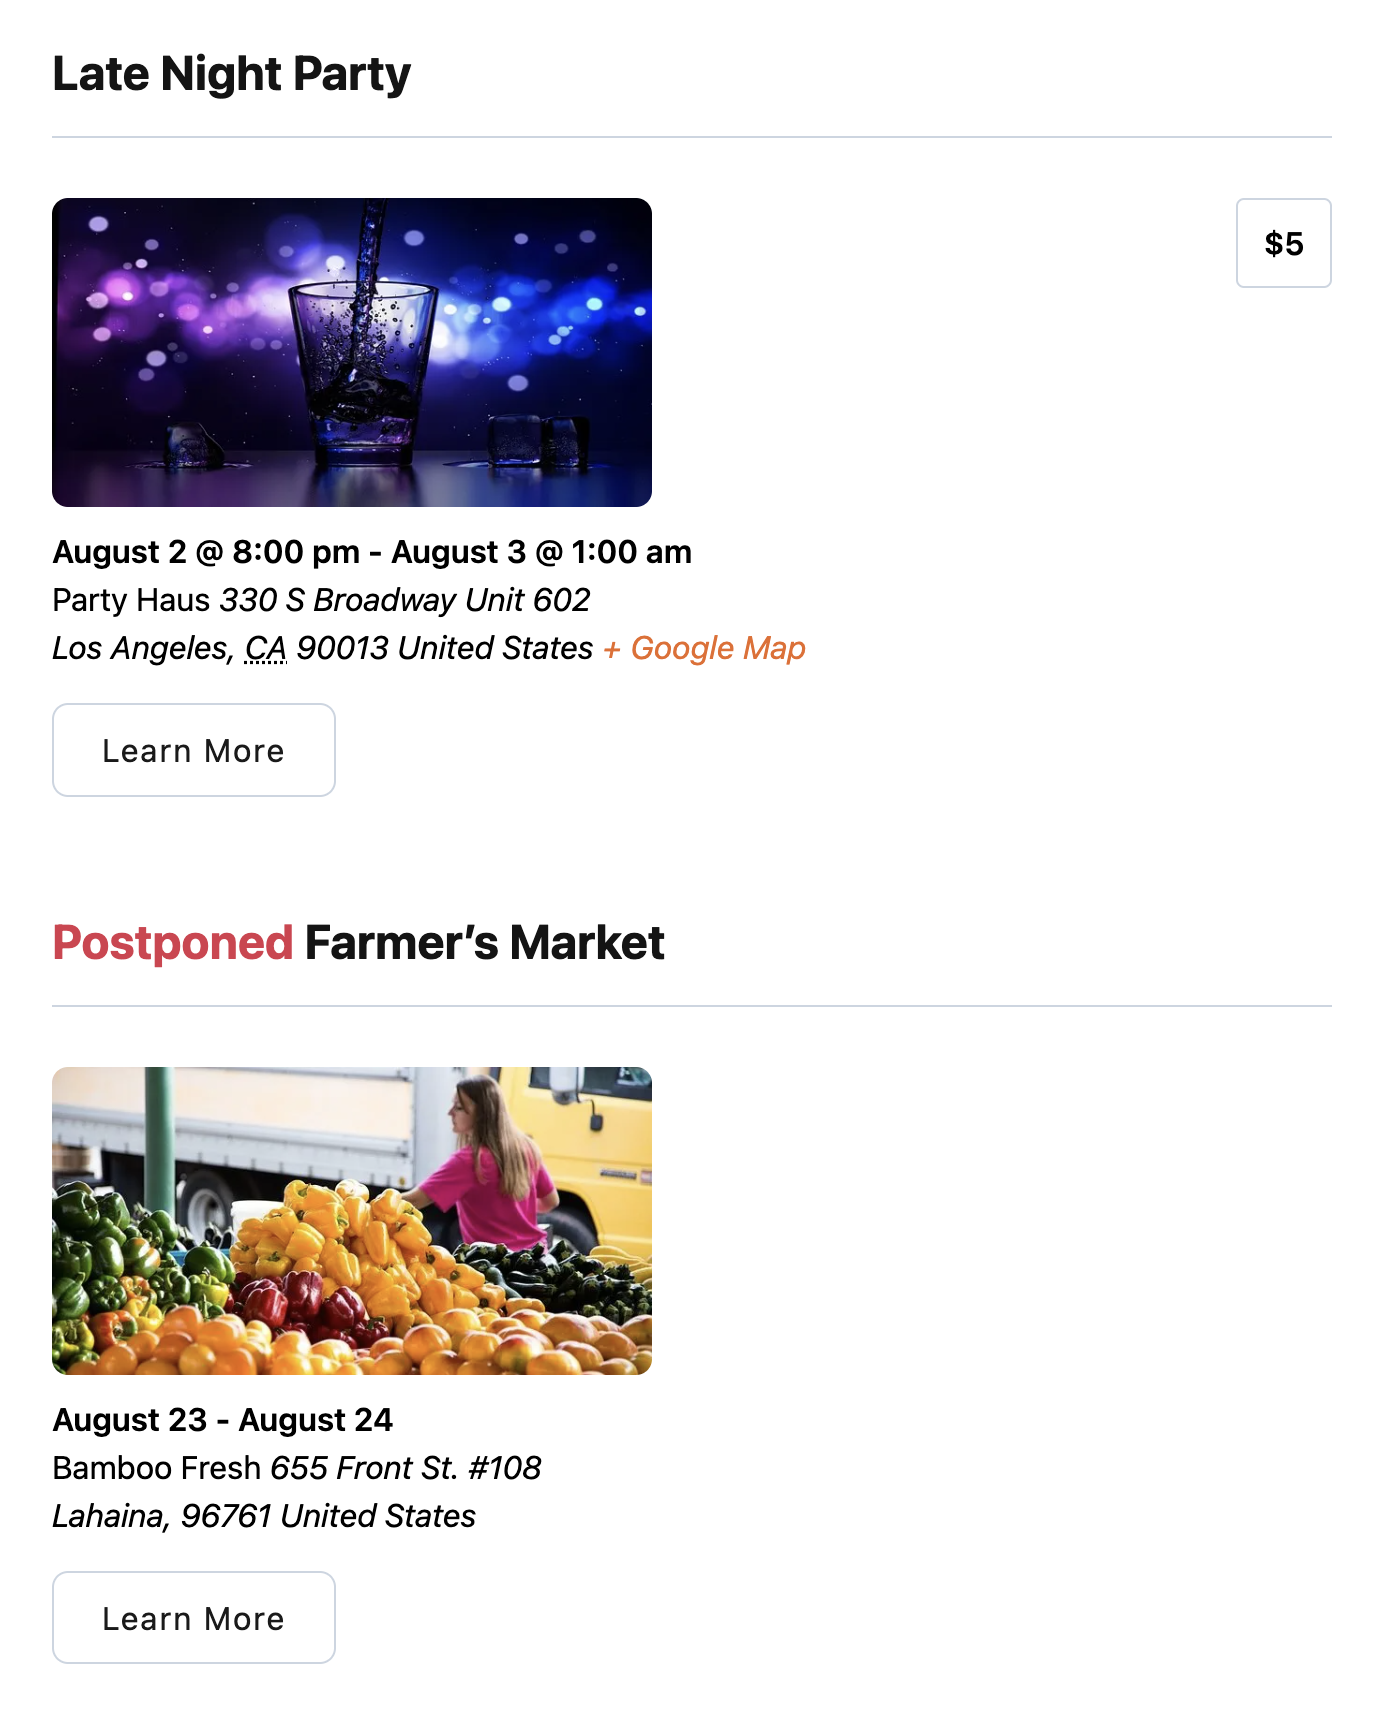
You can see screenshots and examples of the designs below, or view some examples on the demo site.
Standard Design
If you would like to output the events with no styling (CSS), just add design="standard" to the shortcode:
[ecs-list-events design="standard"]
Compact Design pro only
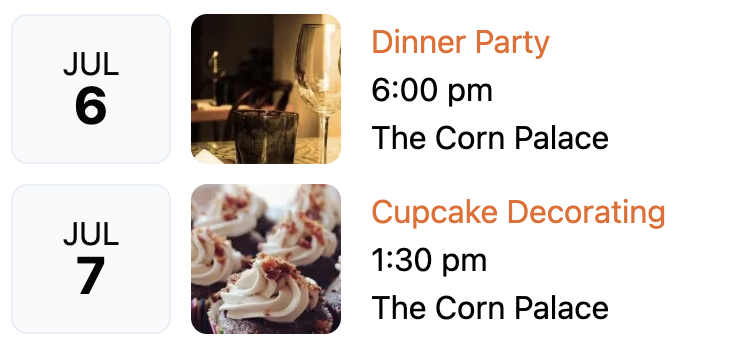
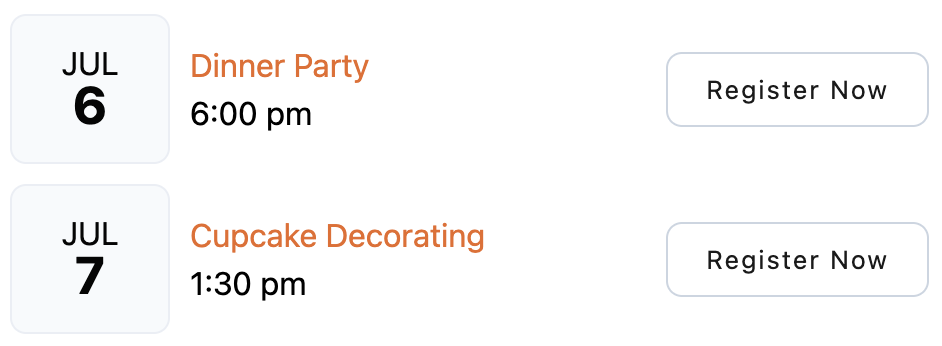
If you would like to use a more compact view, just add design="compact" to the shortcode:
[ecs-list-events design="compact"]
You can customize the colors using fgthumb (text color of the date) and bgthumb (background color), for example:
[ecs-list-events design="compact" fgthumb="#efefef" bgthumb="#000000"]
[ecs-list-events design="compact" fgthumb="black" bgthumb="red"]
View some more examples on the demo site.
Calendar Design pro only
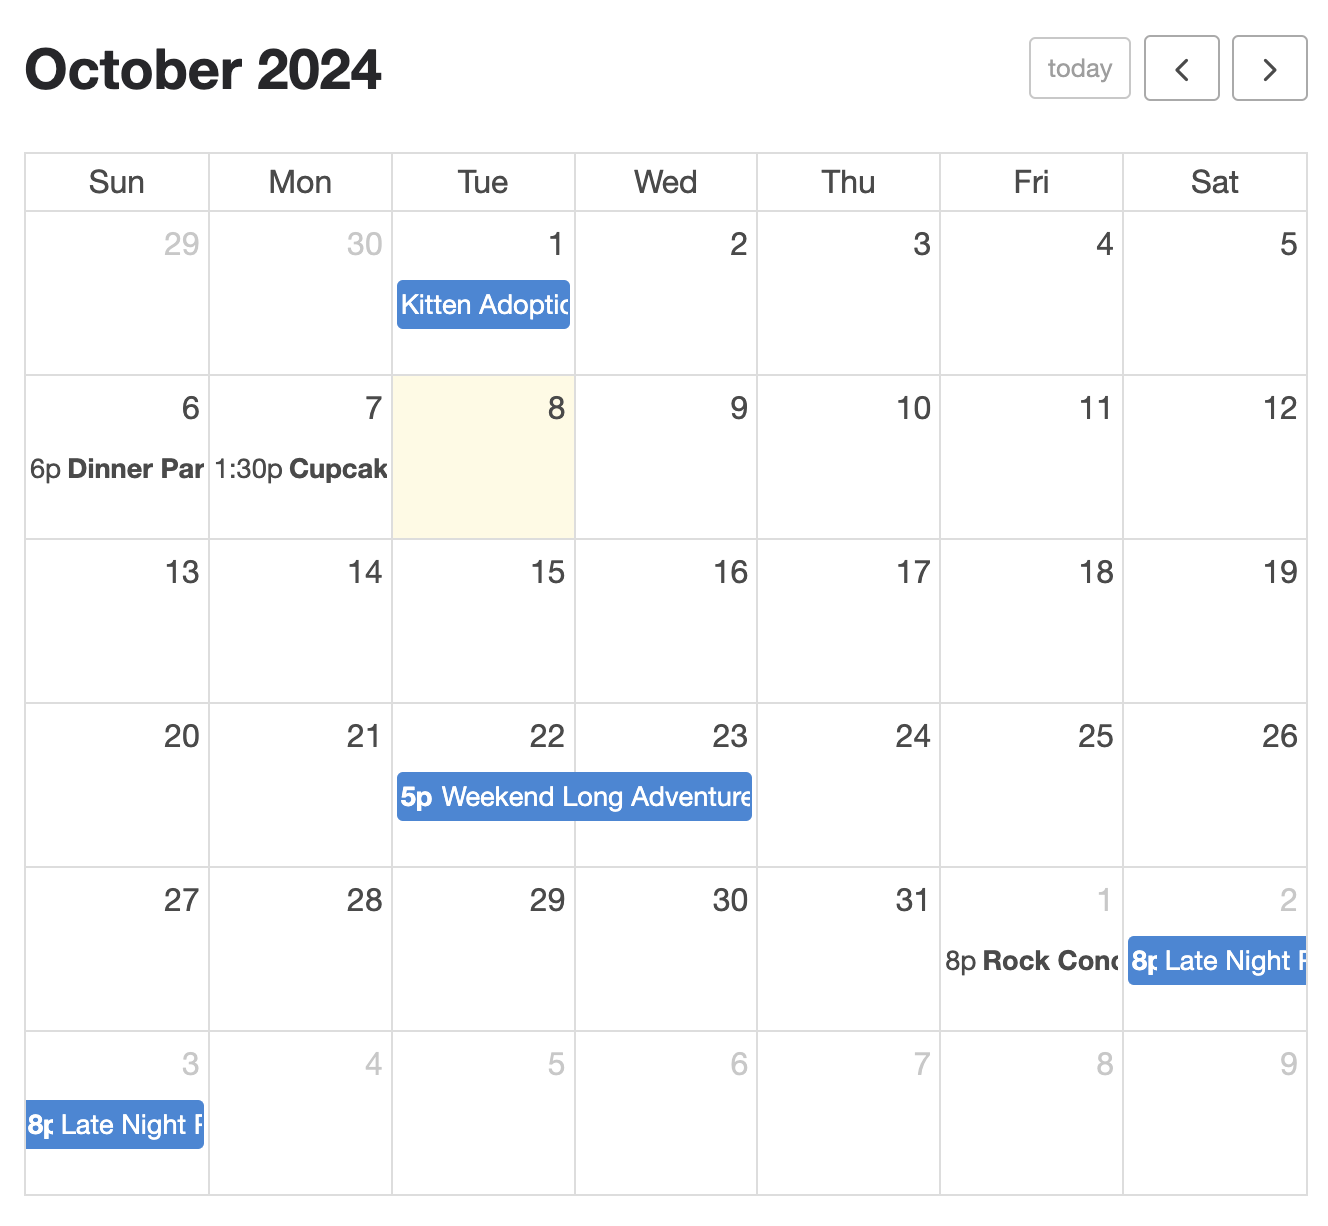
The Events Calendar Shortcode & Block offers a full calendar view of events. Easily display a monthly calendar view of your events. Visitors can switch between months and click on an event to view the full details.
[ecs-list-events design="calendar"]
You can customize the colors of the event items with eventbg (background color) eventfg (foreground color) and eventborder (border color)
[ecs-list-events design="calendar" eventbg="white" eventfg="black" eventborder="#efefef"]
You can change the initial month that is displayed by specifying a default date. For example to set the default to December 15th 2020 (and show December 2020) use:
[ecs-list-events design="calendar" startdate="2020-12-15"]
You can also change the first day of the week, where 0 is Sunday, 1 is Monday and so on:
[ecs-list-events design="calendar" first_day_of_week="1"]
Last but not least you can add a filter bar to the top with:
[ecs-list-events design="calendar" filterbar="true"]
View more examples of the calendar design on the demo site.
Columns/Horizontal/Photo or Table Design pro only
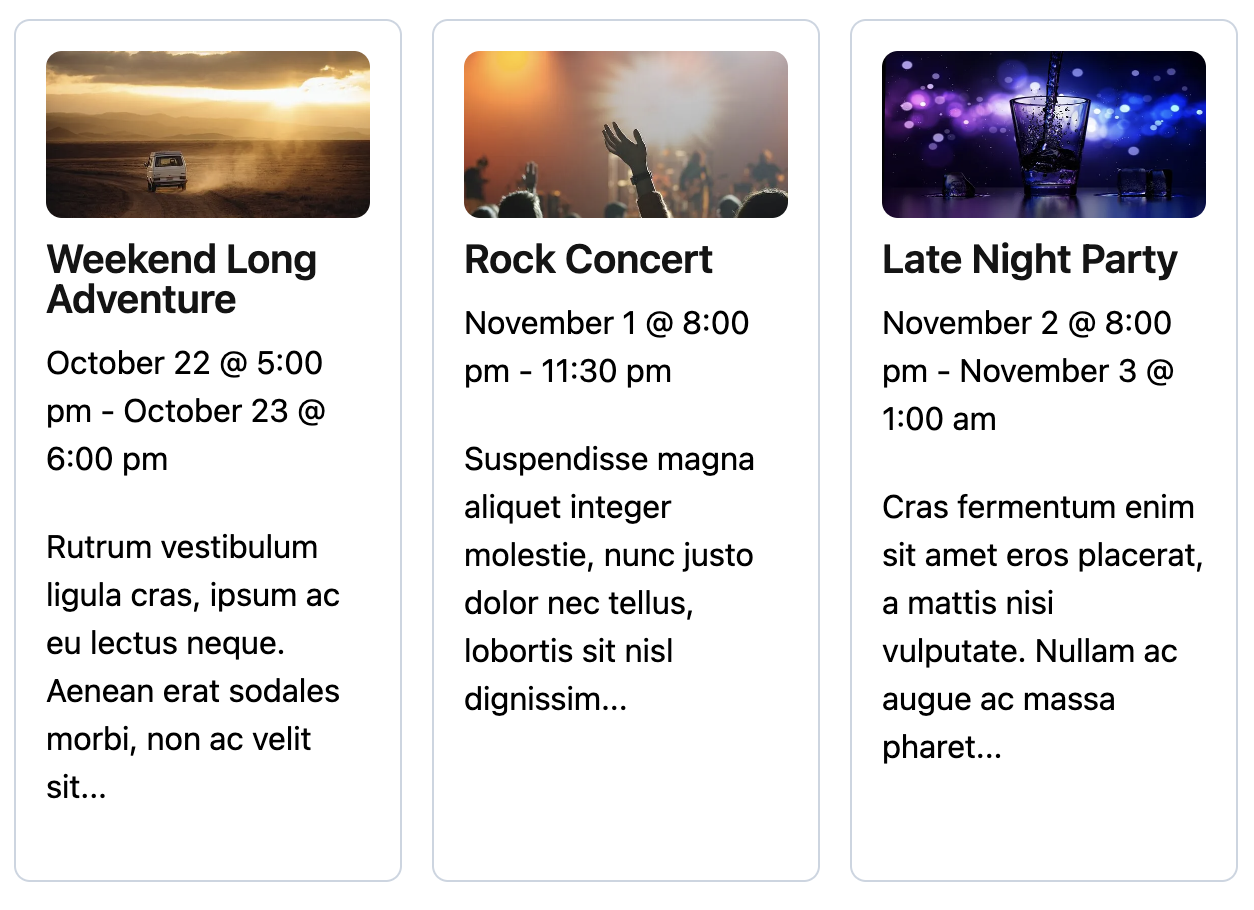
Split events into columns so they’re easy to read and visually appealing. Looks great when events have photos (featured images) but works either way. Use design="columns" for a pinterest-style layout where the rows flow into each other, or design="table" to have the tops of each row line up with each other.
View examples of the Columns/Horizontal/Photo design or the Table design on the demo site.
Grouped Design pro only
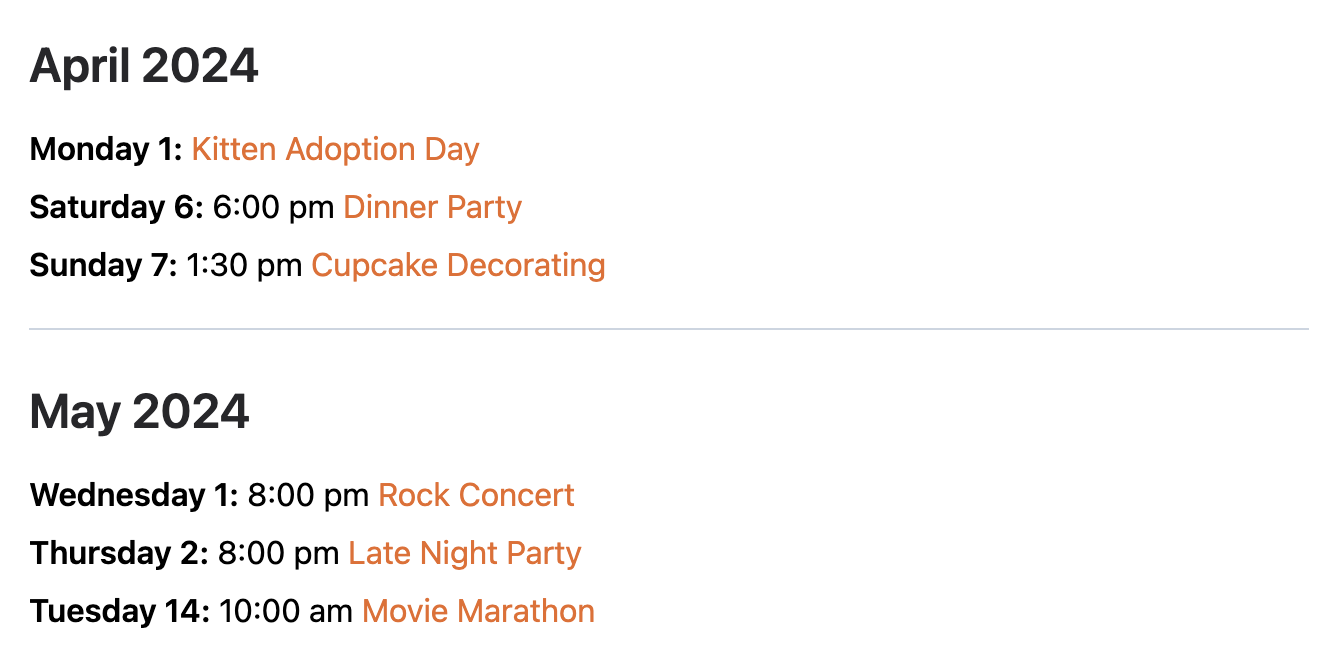
This design is great for lots of events, to show the date of the event with just the time, title and venue of each event underneath.
If you would like to group the events by day with just the time under each date, just add design="grouped" to the shortcode:
[ecs-list-events design="grouped"]
You can also optionally include the venue with:
[ecs-list-events design="grouped" venue="true"]
View examples on the demo site.
Additional Options
You can also customize the output of certain designs with things like:
- titlesize to customize the size of the title, ie. titlesize="18px"
- thumb="true" to show the event thumbnail image (if any)
- excerpt="true" to show the event summary description under the title
- venue="true" to show the venue name under the title
- timeonly="true" to show only the start time
- button="View Details" to show a button with a link to the event (change "view details" to whatever you want)
- buttonlink="website" to use the event website URL instead of the regular link for the button
- buttonbg and buttonfg to customize button color
The demo site has a number of examples of the designs, but if you can't find what you're looking for let us know! You also have the option for custom event calendar design, shown below.
Customizing the Event Output using Shortcode Variables pro only
You can use variables to decide what event data appears, using either an existing design or a completely blank one. For example:
[ecs-list-events design="table"]
{thumbnail}
{url}{title}{/url}
{date}
[/ecs-list-events]
This will change the data for each event to include the thumbnail (if there is one), the title linked to the event, and the event schedule details.
You can still use the event filtering options to decide what events display, such as only showing a single event with id="..."
This powerful system also allows you to conditionally show content only if the event has certain details. For example:
[ecs-list-events design="columns"]
{if_cost}Event Cost: {cost}{/if_cost}
{thumbnail}
{url}{title}{/url} {if_status}Status: {status}{/if_status}
{start_date} @ {start_time}
[/ecs-list-events]
This will only show the "Event Cost:" text if the event has a cost, and the "Status:" label (and the status) if the event has a status such as Cancelled or Postponed.
Support has also been added for any fields added using Advanced Custom Fields (ACF) or when using Additional Fields in Events Calendar PRO!
All Shortcode Variables
| Event Data | Variable | Description |
|---|---|---|
| Link | {url}{/url} | The text between {url} and {/url} will be linked to the event. Use {url:new_tab} to have the link open in a new tab. |
| Event Website Link | {website_url}{/website_url} | The text between {website_url} and {/website_url} will be linked to the event. Use {website_url:new_tab} to have the link open in a new tab. |
| Map Link | {map_url}{/map_url} | The text between {map_url} and {/map_url} will be linked to the map of the event opening in a new window. |
| Button | {button}{/button} | The text between {button} and {/button} will be linked to the event. Use {button:new_tab} to have the link open in a new tab. |
| Title | {title} | For example, show the title with a link using {url}{title}{/url} |
| Date | {date} | Full event schedule details with date and time. |
| Content | {content} | The content text of the event |
| Event Excerpt | {excerpt} | |
| Thumbnail or Featured Image | {thumbnail} | |
| Start Date | {start_date:format} | Use only {start_date} to show in the default format, or use formatting characters ie. {start_date:Y-m-d} |
| Start Time | {start_time:format} | Use only {start_time} to show in the default format, or use formatting characters ie. {start_time:H:i} |
| End Date | {end_date:format} | Use only {end_date} to show in the default format, or use formatting characters ie. {end_date:Y-m-d} |
| End Time | {end_time} | Use only {end_time} to show in the default format, or use formatting characters ie. {end_time:g:i a} |
| Status | {status} | Status if the event is canceled or postponed. |
| Cost | {cost} |
Venue
| Event Data | Variable | Description |
|---|---|---|
| Venue Url | {venue_url}{/venue_url} | The text between {venue_url} and {/venue_url} will be linked to the venue page |
| Venue Website Url | {venue_website_url}{/venue_website_url} | The text between {venue_website_url} and {/venue_website_url} will be linked to the venue website |
| Venue Name | {venue_name} | |
| Venue Address | {venue_address} | |
| Venue Phone | {venue_phone} |
Organizer
| Event Data | Variable | Description |
|---|---|---|
| Organizer Url | {organizer_url}{/organizer_url} | The text between {organizer_url} and {/organizer_url} will be linked to the organizer page |
| Organizer Website Url | {organizer_website_url}{/organizer_website_url} | The text between {organizer_website_url} and {/organizer_website_url} will be linked to the organizer website |
| Organizer Name | {organizer_name} | |
| Organizer Phone | {organizer_phone} | |
| Organizer Email | {organizer_email} | |
| Organizer Website | {organizer_website} |
Conditional Tags
| Conditional | Only show if |
|---|---|
| {if_thumbnail}...{/if_thumbnail} | Thumbnail (featured image) |
| {if_cost}...{/if_cost} | Cost |
| {if_status}...{/if_status} | Status (Cancelled, Postponed) |
| {if_venue}...{/if_venue} | Venue |
| {if_organizer}...{/if_organizer} | Organizer |
| {if_all_day}...{/if_all_day} | An all-day event |
| {if_website_url}...{/if_website_url} | Website Url |
You can also use the _not version of most of the above variables to show content only if the event does not have that data:
[ecs-list-events design="columns"]
{if_cost}Event Cost: {cost}{/if_cost}
{if_not_cost}Free!{/if_not_cost}
{thumbnail}
{url}{title}{/url}
{if_venue}Location: {venue_name}{/if_venue}
{if_not_venue}No Location{/if_not_venue}
[/ecs-list-events]
Advanced Custom Fields (ACF)
For a field with name "my_field" just add {my_field} in your template. For example, with a field for ticket pickup time called "pickup_time":[ecs-list-events]
{thumbnail}
{title}
{start_date:F j, Y}
{if_pickup_time}Pickup time: {pickup_time}{/if_pickup_time}
[/ecs-list-events]
Additional Fields (Events Calendar PRO)
To add values from an Additional Field, you'll need to find the name of the field first. When editing an event, find the field you want to filter by and right-click on it to show a menu. Pick Inspect to show additional details on the field:
Here the saved name of this field is _ecp_custom_2, which can be added in a template:
[ecs-list-events]
{thumbnail}
{title}
{start_date} @ {start_time}
{if__ecp_custom_2}More Details: {_ecp_custom_2}{/if__ecp_custom_2}
[/ecs-list-events]
If there are square brackets in the name - for example _ecp_custom_3[] - do not use the square brackets in the shortcode, just the _ecp_custom_3 part.
Custom Design pro only
With Events Calendar Shortcode & Block Pro, you can customize your events lists and calendars as much as you need! You can do this “no code”, or use custom CSS if you’d like. You’ll be able to use the shortcodes above to make most of the changes.
If you'd like to completely customize the output you can create a folder called tecshortcode in your theme directory, and in it create a file called custom.php
Then, add your shortcode with "custom" as the design name (which matches custom.php):
[ecs-list-events design="custom"]
You can rename custom.php to another name and even create multiple design templates to use elsewhere on your site. Note that you should place this folder within a child theme so any updates to your main theme do not override your templates.
Available Variables in a Custom Design Template
The Events Calendar Shortcode Pro will pass several variables you can use in the implementation of your design:
- $post (WP_Post) of the current event
- $posts (WP_Post[]) array of all the events
- $post_index (int) index of the current event, starting at zero. So $post_index == 0 is the first event, and count( $posts ) - 1 == $post_index is the last one
- $atts (array) the attributes/options of the current shortcode
- $event_output (string) HTML of the output that will be overridden by your template
You can use the functions provided by The Event Calendar (by StellarWP, formerly Modern Tribe) along with other WordPress functions on a post.
Customizing the Default Design
You can copy the-events-calendar-shortcode-pro/templates/default_tpl.php to wp-content/themes/your-theme/tecshortcode/default.php then edit the default.php file as needed.
Note that you need to keep it named default.php in order to have the default options and styling come though. The template version is also slightly different than the non-template version, but has the majority of the features and functionality as an example for you to customize.
Customizing the Compact Design
Want to customize the Compact design? You can copy the-events-calendar-shortcode-pro/templates/compact_tpl.php to wp-content/themes/your-theme/tecshortcode/compact.php then edit the compact.php file as needed.
Note that you need to keep it named compact.php in order to have the default options and styling come though. The template version is also slightly different than the non-template version, but has the majority of the features and functionality for you to customize.
Customizing the Grouped Design
You can copy the-events-calendar-shortcode-pro/templates/grouped.php to wp-content/themes/your-theme/tecshortcode/grouped.php then edit the grouped.php file as needed.
Note that you need to keep it named grouped.php in order to have the default options and styling come though.
Customizing the Columns/Horizontal/Photos Design
You can copy the-events-calendar-shortcode-pro/templates/columns.php to wp-content/themes/your-theme/tecshortcode/columns.php then edit the columns.php file as needed.
Note that you need to keep it named columns.php in order to have the default options and styling come though.
Customizing the Table Design
You can copy the-events-calendar-shortcode-pro/templates/table.php to wp-content/themes/your-theme/tecshortcode/table.php then edit the table.php file as needed.
Note that you need to keep it named table.php in order to have the default options and styling come though.
Customizing the Filter Bar Design
You can copy the-events-calendar-shortcode-pro/templates/filterbar.php to wp-content/themes/your-theme/tecshortcode/filterbar.php then edit the filterbar.php file as needed.
Note that you need to be careful about removing or modifying certain classes and HTML or the script that controls the filter bar may break. If it does, revert back to the original and test changes often to see what cannot be modified.
Creating a Custom Filter Bar Filter
You can find more detail on creating a custom filter for the filter bar in this blog post.
Customizing the Pagination Navigation
You can copy the-events-calendar-shortcode-pro/templates/pagination.php to wp-content/themes/your-theme/tecshortcode/pagination.php then edit the pagination.php file as needed.
Note that you need to be careful about removing or modifying certain classes and HTML or the script that controls the pagination may break. If it does, revert back to the original and test changes often to see what cannot be modified.
Access Event Data
When your template is loaded, the data for the event is the current post. You can use any tribe_ functions like tribe_get_event_link() and tribe_get_cost()
Accessing Shortcode Attributes
You can use the variable:
$atts
to access any shortcode options or attributes within the custom template. For example if you had the shortcode:
[ecs-list-events design="custom" cost="true"]
You could use the following template in custom.php to use the cost attribute along with showing the event meta:
<?php do_action( 'tribe_events_single_event_before_the_meta' ) ?>
<?php tribe_get_template_part( 'modules/meta' ); ?>
<?php if ( Events_Calendar_Shortcode::isValid( $atts['cost'] ) ): ?>
<?php tribe_get_cost( null, true ); ?>
<?php endif; ?>
<?php do_action( 'tribe_events_single_event_after_the_meta' ) ?>
If you want to add your own attributes you'll need to define their default value using the ecs_shortcode_atts filter. For example to add an attribute "new":
function add_my_attributes( $default_atts ) {
$default_atts['new'] = '';
return $default_atts;
}
add_filter( 'ecs_shortcode_atts', 'add_my_attributes' );
That’s all! The Events Calendar Shortcode & Block is a COMPLETE solution for you. Get the WordPress plugin to display your events in whatever layout and with whatever parameters you need.
Absolutely ZERO risk. 14 day full refund policy, no questions asked.
This plugin is not developed by or affiliated with The Events Calendar or Modern Tribe in any way.